

 0800 987 1087
Scanning as a visual field loss compensatory strategy.
This page provides an introductory guide to scanning as a functional coping technique for those with left and right sided visual field loss.
Using scanning to compensate for visual field loss (homonymous or quadrantanopia hemianopia).
Visual field loss can make reading and navigation difficult. It can also place you at risk because of unseen objects and dangers. Here are some common examples:
- Missing food to one side of your plate.
- Knocking over unseen objects.
- Losing items within the home, such as keys and mobile phone.
- Finding it difficult to read.
- Bumping into objects that seem obvious to others
- Becoming startled when someone approaches.
- Not always being aware of the full visual picture.
At Visibility Scotland, we deliver and recommend a compensatory scanning vision rehabilitation programme.
Stroke and brain injury support – Visibility Scotland
What is a compensatory visual scan?
This compensatory technique utilises the area of good vision (intact visual field) to see to the side with reduced or no vision (visual field loss).
How to scan
To scan, you must turn your chin towards the shoulder on the side where you have visual field loss.
If your visual field loss is left sided, you would turn your chin towards your left shoulder. Similarly, if your visual field loss is right sided, you would turn your chin towards your right shoulder.
Scanning is a repetitive compensatory technique. If you don’t scan, you are in danger of missing vital visual information.
Please initially practice scanning when seated. Being seated means you are safe and will not lose balance when turning your chin towards your shoulder (scanning).
Reading
Depending on the side of your visual field loss, you may find locating the start or end of a sentence challenging when reading.
Here are some helpful tips:
If you have left visual field loss, you may find it challenging to locate the beginning of sentences and if you have right visual field loss, you may find it challenging to locate the end.
A compensatory strategy is to use your finger or thumb to hold the paper and act as a visual prompt to the side of your visual field loss (left or right).

ID: A finger used as a visual prompt for reading with left visual field loss.
ID: A finger used as a visual prompt for reading with right visual field loss.
Placing a ruler on the left or the right side can also help as it can be used as a visual anchor. Alternatively, the ruler can be placed under the reading line. This technique blocks the bottom text and can help with visual processing by reducing visual clutter.

ID: A ruler used as a visual anchor for reading with left visual field loss.
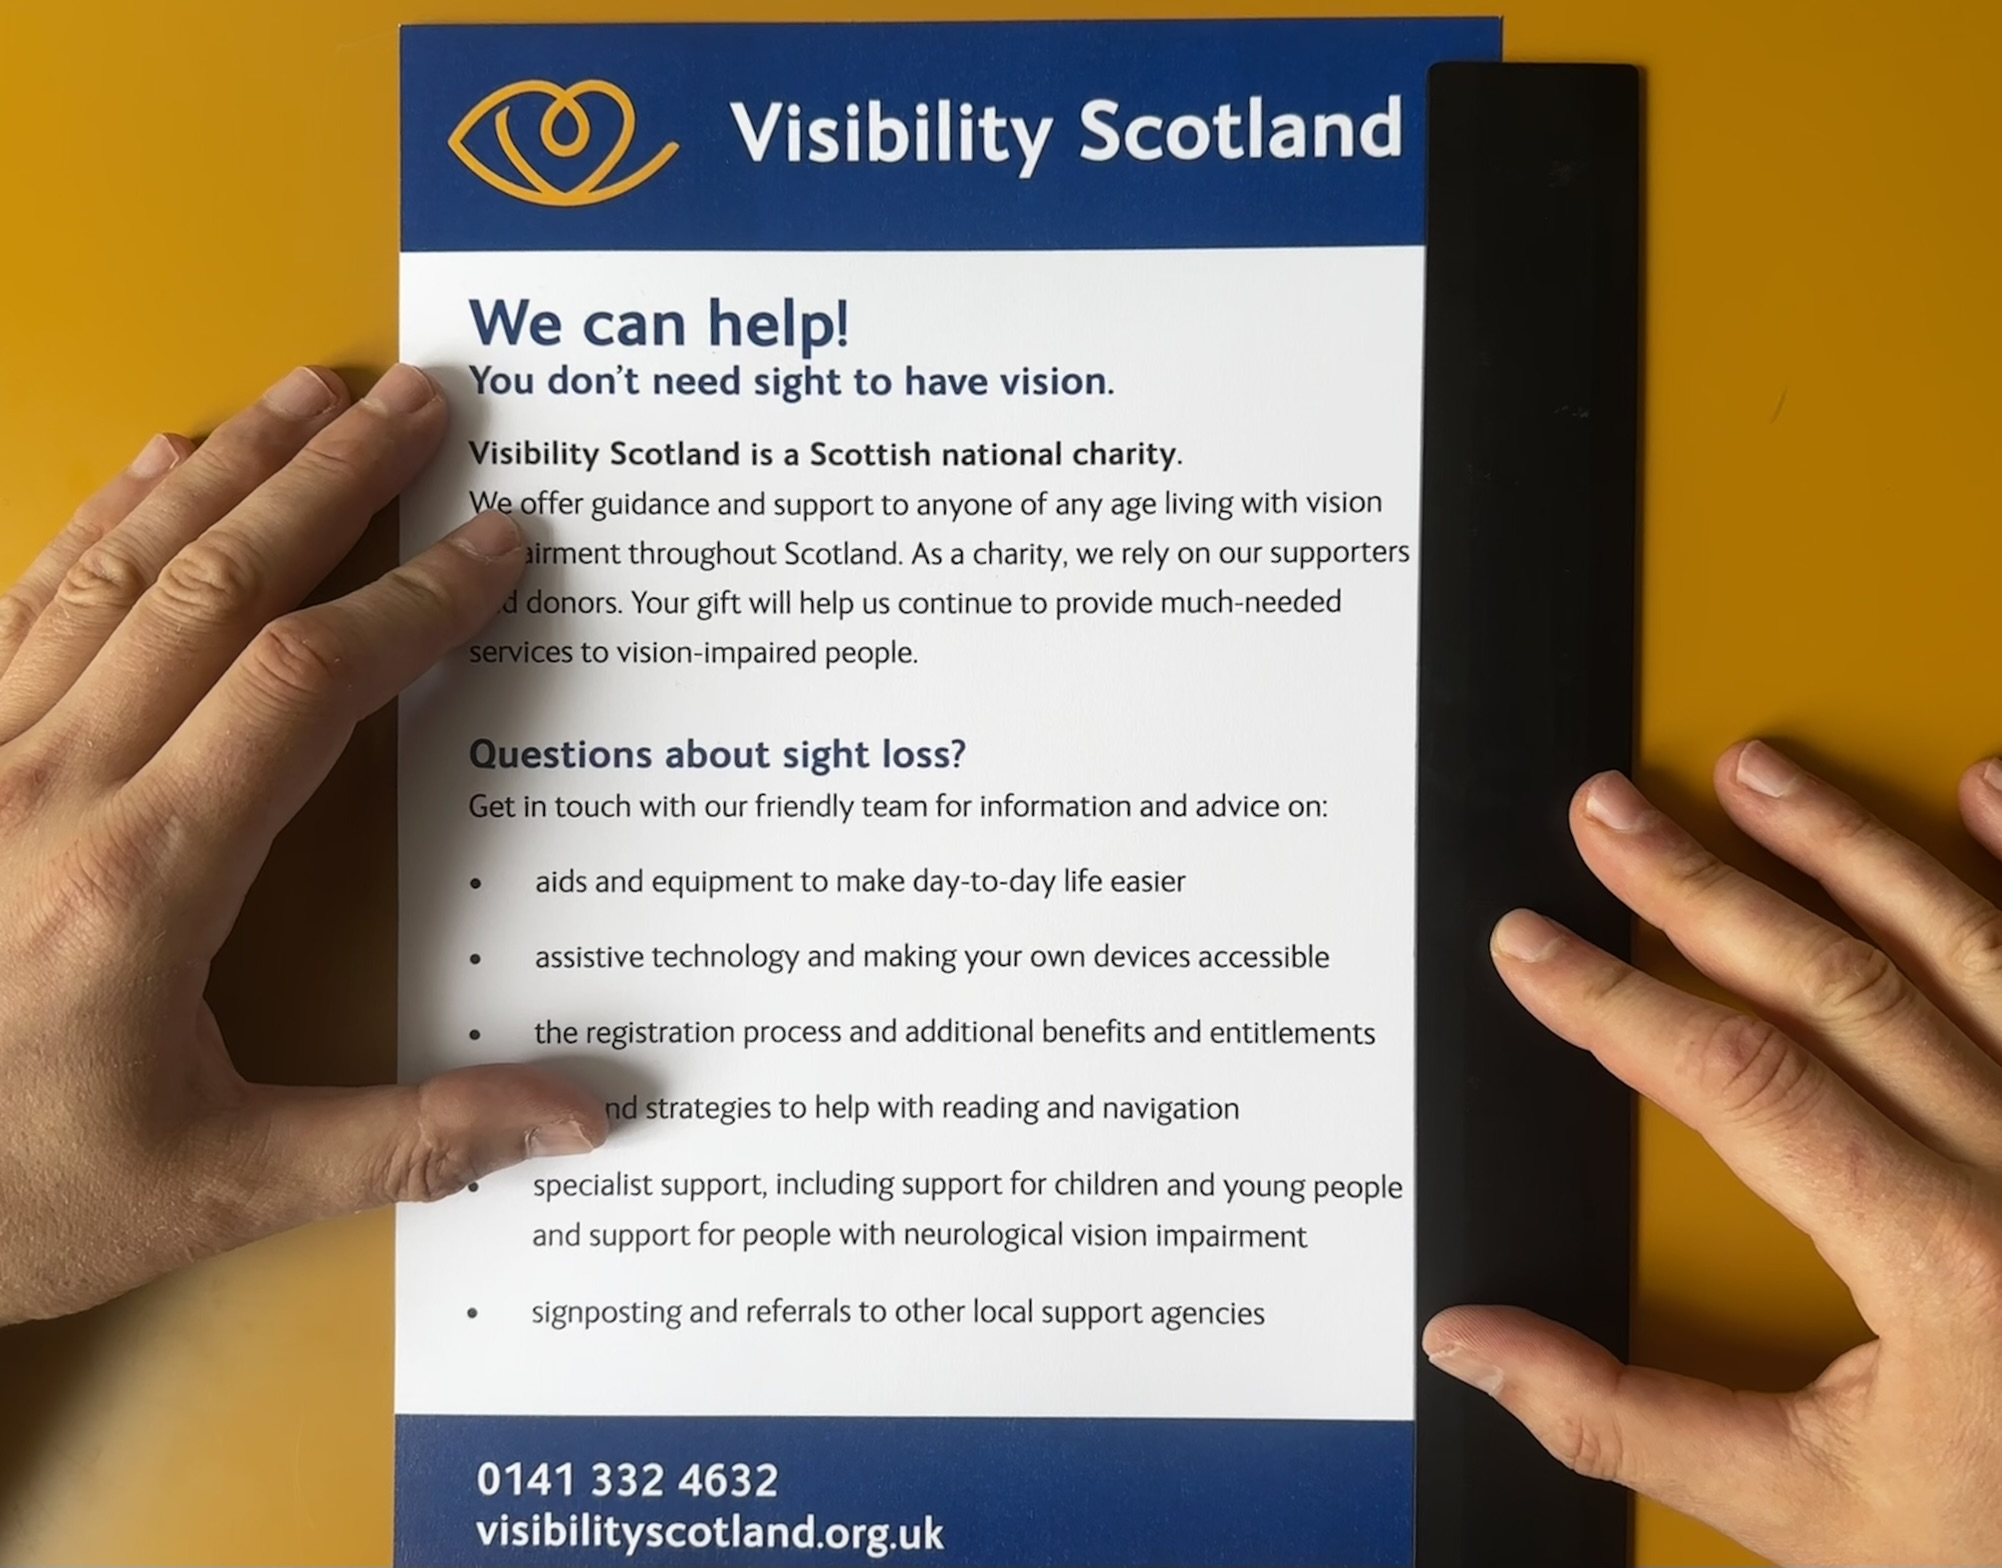
ID: A ruler used as a visual anchor for reading with right visual field loss.

ID: A ruler placed under the reading line to help reduce visual clutter.
Practice scanning whilst seated
To practice scanning whilst seated, use a chair without wheels.
To conduct this exercise, we recommend having two visual targets. This could be an item in your home such as a picture or ornament, or a brightly coloured post-it note. The visual target should be something that stands out to you.
Position a visual target directly in front of where you’re seated and another at 90 degrees to the side of your visual field loss (left or right).
For example, if you visualise a clock face, target one would be at 12 and target two would be at nine if you have left visual field loss. A right visual field loss would require a target at 12 and another at three o’clock.
Whilst seated, start your scan at either the three o’clock (right visual field loss) or nine o’clock (left visual field loss) target, and turn your chin back to midline to the 12 o’clock target which is directly in front of you.
This constitutes a single scan, however scanning is a repetitive compensatory technique and must be repeated.
The video below provides a demonstration of how to practice scanning whilst seated.
Top tips
- Keep your shoulders straight and level without any rotation; all movement should come from the neck.
- Scanning is slow, steady and systematic.
- Leave a gap of three to four seconds between scans.
- Keep practice sessions short, no more than five minutes per day is recommended.
Once you have mastered scanning when sitting, you will transfer the new skill when walking.
Walking and scanning
Be careful, as walking and scanning can be tricky. We are accustomed to looking where we are going, but now we need to break this habit and get used to periodically scanning to our left or right (dependent on the side of visual field loss) as we walk.
It is vital to remain safe when learning and implementing scanning. Others can keep you safe and offer support. The safest place for you as a pedestrian is the middle of the pavement, away from street clutter.
Visibility Scotland recommends getting support from a Vision Rehabilitation Specialist. If you would like to know how to contact your local team, please get in touch.
Vision rehabilitation – Visibility Scotland Knowledge Centre
Visibility Scotland’s vision rehabilitation service
How to walk whilst scanning
Scanning is a repetitive strategy, scan and plan. Always start by scanning to the side of your visual field loss (left or right) and return to the centre before repeating the scan. You should complete one scan to the side of your visual field loss before setting off.
When scanning, you should feel a stretch in your neck muscle when turning your chin and vision to the side of your visual field loss. This stretch in your neck muscle indicates that you have scanned appropriately to the side of visual field loss. Remember: do not turn your body, only your head. Keep your shoulders straight.
Caution: do not adopt a head tilt or fixate on one spot; this puts you at high risk of bumping into a hazard.
Watch for hazards approaching you on the side of your visual field loss and keep them in your peripheral view until you have safely passed them. Examples of common hazards are lampposts, wheelie bins, and litter. Do not rely on visual memory. Please ensure you have someone with you when you first attempt scanning whilst walking.
The video below provides a demonstration of how to scan whilst walking.
Top tips
- When walking with someone, ensure you remain in the middle of the pavement
- Initially, the person walking with you should be on the side of visual field loss.
- Once you are more competent and confident, ask them to switch to the other side, your unaffected side.
You are responsible for keeping yourself safe on the affected side, so avoid becoming overly reliant on others for this duty.
- If you use a symbol cane, ensure it extends beyond your body on the side of your vision loss. The aid prompts people to give space when passing
A symbol cane may be gained from your local authority via their sensory support service.
Scan frequency
The ideal frequency is one scan every three to four steps. However, it can be off-putting to try to count your steps. Focus on the scan head movement first before thinking about frequency. Having someone with you can help you fine-tune to the correct frequency in time.
There are no hard or fast rules about walking speed or pacing. However, a slower pace means a slower scanning frequency.
What to look for
Look out for upcoming hazards, such as bike riders on the pavement, joggers, large groups of people, and on-street works. Being aware allows for planning and situational awareness.
Check pavement positioning. Looking into the distance allows you to take in both the kerb-line and the shoreline, giving you parameters to assess your position on the pavement.
Checking for upcoming underfoot hazards. It can be tempting to remain fixed on looking down due to the fear of falling. This must not happen; you need good posture to scan effectively. Think about a lighthouse, a lighthouse beams light across the sea at night, think about your vision being a beam of light that needs to visually search from the side of visual field loss to midline, and back out again. Slow, steady, and systematic.
These are the basic elements of scanning. You may think there is much to consider, and you would be right.
However, through practice, this will become easier and less deliberate. Eventually, this will become habitual, but only with constant practice. You should not move through an environment, indoors or outdoors, without scanning.
Terminology
The side of the pavement next to the road is the kerb-line
The opposite side is called the shoreline.
It can be tempting to stay close to the shoreline, feeling this is the safest place. However, shorelines can also be where lamp posts and other street furniture are placed. You are also at great danger of bumping into pedestrians entering and exiting shops when in an urban environment.
Basic points for mobility and navigation scanning
- The middle of the available pavement/footway is the safest place to be
- Always scan before moving
- One full scan every three to four steps
- When walking, start with people on the side of visual field loss initially before asking them to move to the other side once you feel confident when scanning and walking
- Take time between each scan to look and process oncoming hazards
- You do not need to scan to your unaffected side; this will operate as it has always done. Remember the target training.
- Cross the road using pedestrian crossings. If the crossing is uncontrolled, then follow the rules of the Highway Code.
Take time to recognise that you are learning a new behaviour that may conflict with your previous habits for walking and navigating outdoors. Remember to celebrate success. It will take patience, time and practice.
Also, be aware of fatigue. Headway Charity, linked at the bottom of the page, can provide a handbook on this. Avoid trying to “push through” fatigue, as this can make you more vulnerable and possibly ruin subsequent days.
By staying safe and managing fatigue, you will feel more in charge of your independence and mobility.
If you would like to speak to a member of our team, please get in touch:
- Telephone number: 0800 987 1087
- Email: info@visibilityscotland.org.uk
If you have enjoyed our resource and would like to donate to help fund our work, please click on the hyperlink below.
Examples of good practice
- Keep your shoulders straight and level without any rotation; all movement should come from the neck
- Scanning is slow, steady and systematic
- The safest place for you as a pedestrian is the middle of the pavement, away from street clutter.
- You are responsible for keeping yourself safe on the affected side, so avoid becoming overly reliant on others for this duty.